本小節的內容是上一小節功能的擴充,把單一的按鈕輸出控制增加到三個,也就是把前一章ESP8266單機模式的【六、5-2.1 使用表單(form)語法控制3顆LED亮滅】小節的範例程式《softAP_6_5_3Led1.ino》,和上一節中【七.1-4】小節的《ESP_CH7_AutoConnectOLED20.ino》程式做一個合併的示範。
<!DOCTYPE html>
<html>
<head>
<meta name='viewport' content='width=device-width, initial-scale=1.0'/>
<meta charset='utf-8'>
<style>body {font-size:120%;} #main {display:table; margin:auto;
padding:0 10px 0 10px;} h3,{text-align:center;} h4,{text-align:center;}
.button {padding:10px 10px 10px 10px; width:100%; background-color: pink; font-size:120%;}
.button2 {padding:10px 10px 10px 10px; width:100%; background-color: yellowgreen; font-size:120%;}
</style>
</head>
<body>
<div id='main'>
<h3>3顆LED亮滅控制示範</h3>
<h4>LED1目前狀態 : 熄滅</h4><br>
<form action='LedOn1'><input class='button' type='submit' value='點亮LED1'>
</form><br>
<h4>LED2目前狀態 : 熄滅</h4><br>
<form action='LedOn2'><input class='button' type='submit' value='點亮LED2'>
</form><br>
<h4>LED3目前狀態 : 熄滅</h4><br>
<form action='LedOn3'><input class='button' type='submit' value='點亮LED3'>
</form><br>
</div>
</body>
</html>
程式名稱:softAP_6_5_3Led_form.html
在說明ESP8266的程式之前,還是要先回到上一章【六、5-2.1】小節中介紹過的網頁html程式:《softAP_6_5_3Led_form.html》,如果我們在一般個人電腦上以瀏覽器執行它的話,會看到【圖七、2-1.4_1】的網頁畫面,因此我的程式中有關網頁的部份便是以它為藍本去實現。
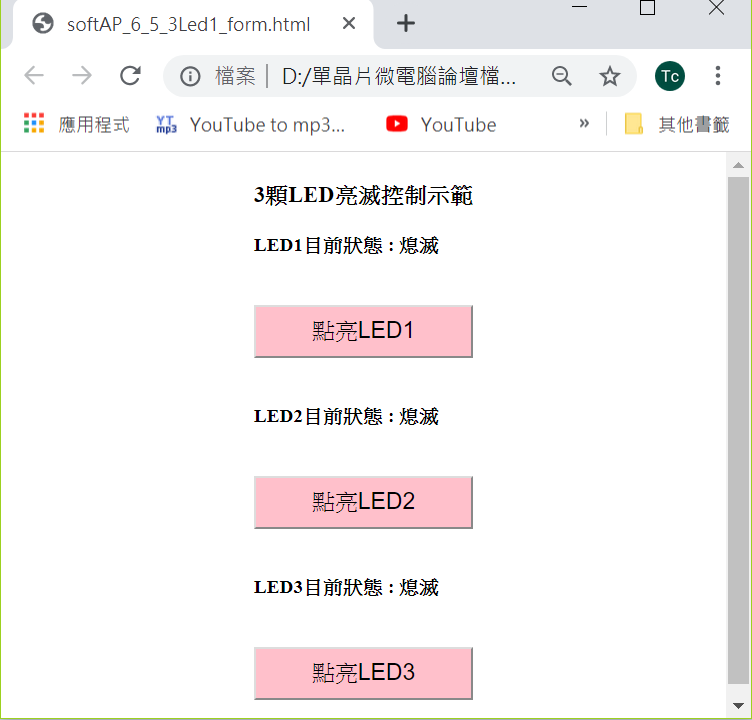
圖七、2-1.4_1 《softAP_6_5_3Led1_form.html》於電腦瀏覽器執行結果
◎ 範例程式功能與動作說明:
1、本範例在開機連線時動作與上一小節(『七.2-1.3 使用表單(Form)的方式控制單一輸出』)相同,會令ESP8266以站點(Station)腳色連接上無線WiFi分享器,並且可以由使用者自行選定WiFi分享器。當連接上無線WiFi分享器後,會在OLED顯示器上顯示由WiFi分享器所分配到的本地IP位址,其畫面和之前的【圖七、2-1.1_1】相同。
2、使用者以行動通信裝置連上同一個WiFi分享器並開啟瀏覽器後(不必管OS的種類),在網址輸入欄輸入所分配到的IP位址,如果是系統剛開機第一次被使用者連線上,則系統會回應【圖七、2-1.4_2】的網頁畫面給使用者的瀏覽器,此時LED狀態是熄滅狀態,而且下方得提示文字為《Home Page》,假如已經有使用者連線及使用過,則系統會依最後一次的狀態顯示對應的頁面。
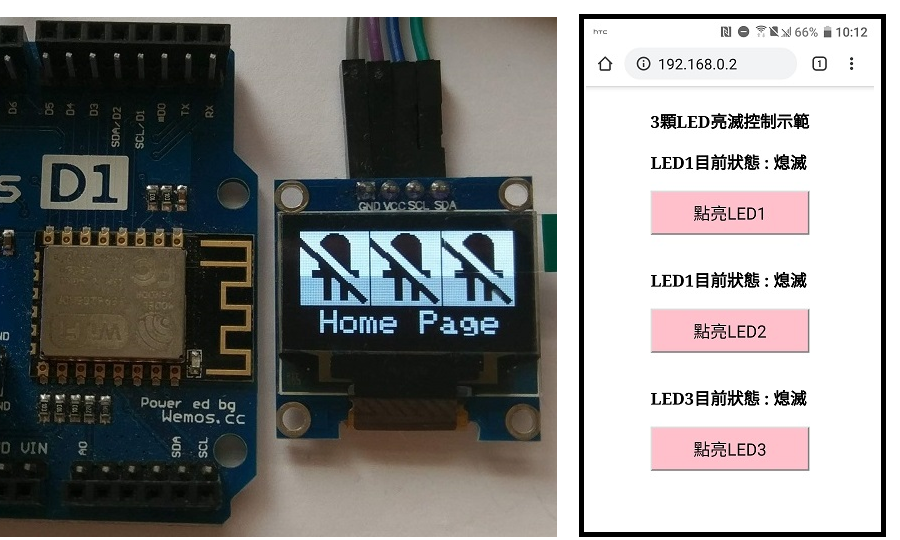
圖七、2-1.4_2 系統開機後使用者第一次連線畫面
3、當使用者按下其中的標記文字為「點亮LED」或「熄滅LED」的按鈕時,除了會令對應的LED會點亮或熄滅之外,系統的OLED顯示器及手機瀏覽器也會把結果反應在螢幕上,由於OLED顯示器螢幕的大小有限,所以下方的提示文字訊息只會顯示最後一次動作的內容,而上方LED顯示的畫面則是目前三顆LED的狀態。下面的【圖七、2-1.4_3】~【圖七、2-1._6】的畫面分別是不同操作情形下,OLED顯示器與手機瀏覽器螢幕對應的情形。
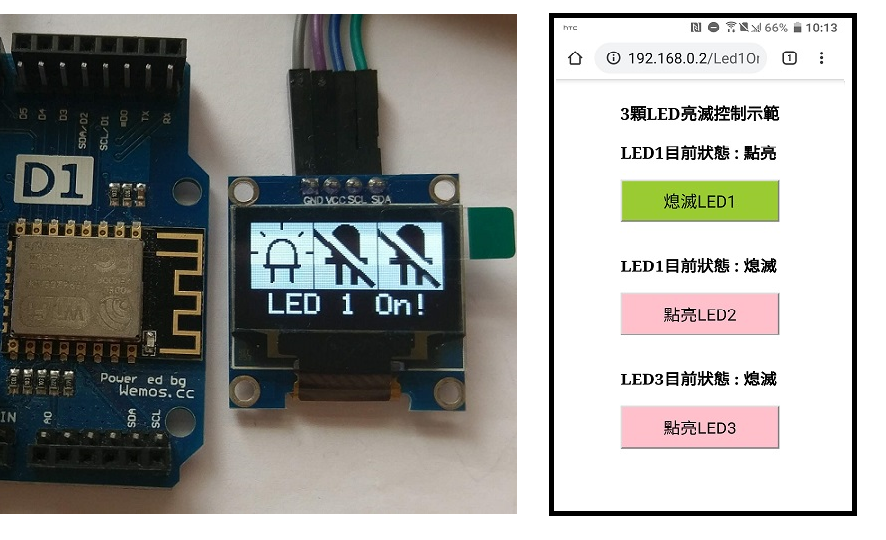
圖七、2-1.4_3 單獨點亮LED1畫面
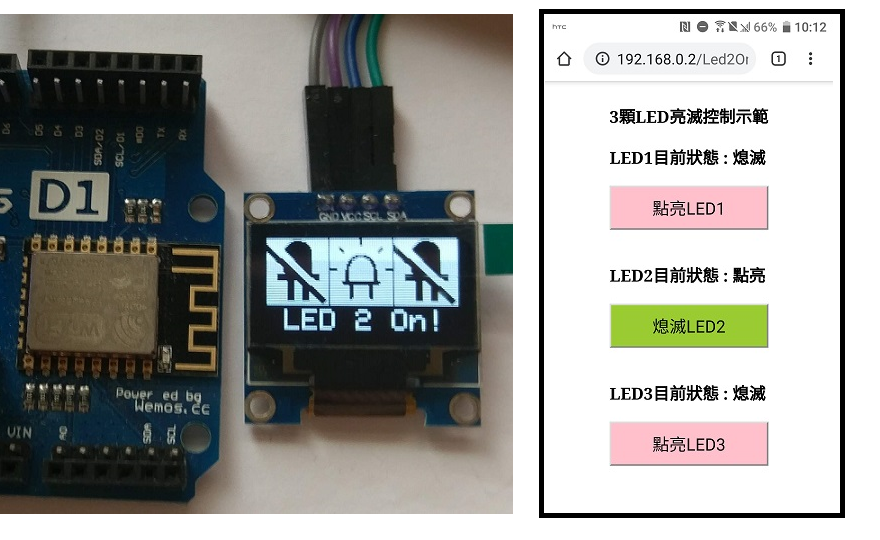
圖七、2-1.4_4 單獨點亮LED2畫面

圖七、2-1.4_5 單獨點亮LED3畫面

圖七、2-1.4_6 點亮全部LED畫面
◎電路圖:
在前一章的【六、5-2.1】小節中,我們使用了ESP-202這塊模組板作為實驗之用,這是因為這塊板子上內建了一顆RGB三色的LED模組,如下面的【圖七、2-1.3_1】所示,其中標記2的位置就是這顆三色LED模組,這樣使用者就可以直接來測試程式不必再連接電路了。在ESP-202塊模組板上,分別使用GPIO12、15、13去推動三色的LED模組的R、G、B三種顏色,而且是以高態輸出點亮LED。
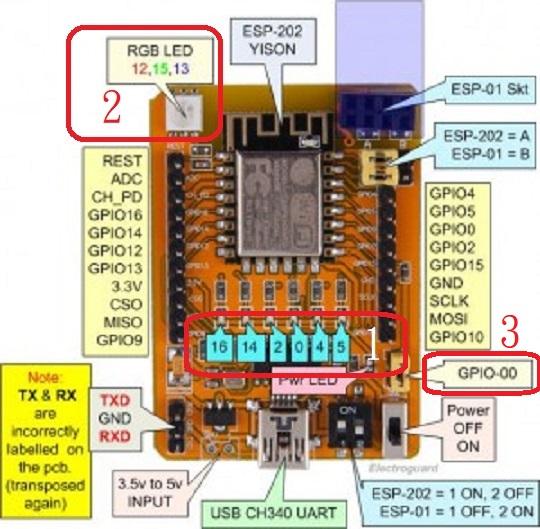
圖七、2-1.4_7 ESP-202 WiFi模組板外觀接腳名稱
如果使用的是NodeMcu系列的模組板,則可使用下面的電路,由於ESP-202模組是以高態輸出點亮LED,為了配合這個特性,因此這三顆LED輸出同樣也是要high才會點亮LED;至於LED的限流電阻,可以依亮度的需要使用220~470歐姆的電阻值。在NodeMcu系列模組板上原來ESP8266的GPIO12、13、15這三隻接腳分別被標示為D6、D7、D8,還請注意腳位之間命名的差異。
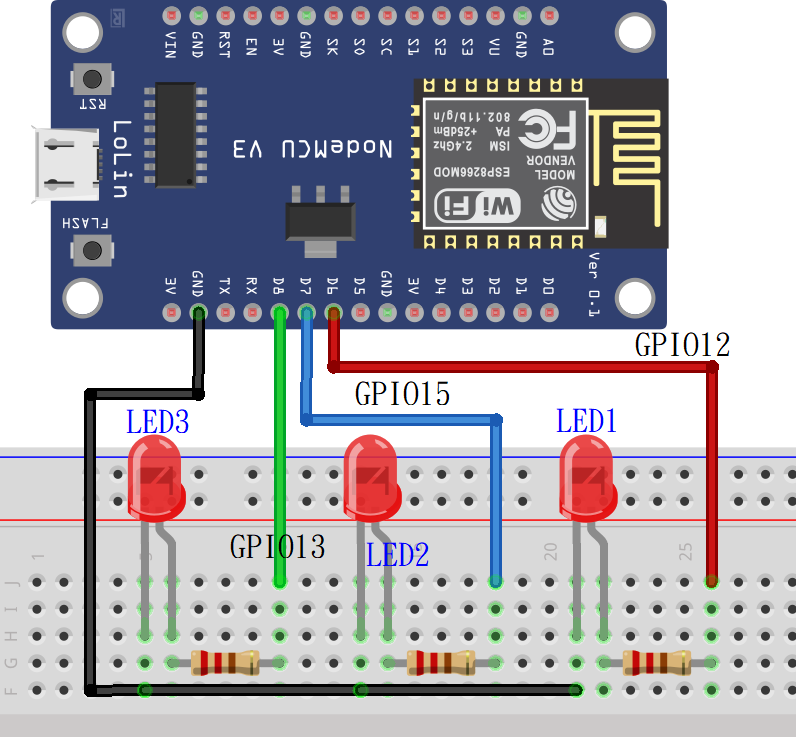
圖七、2-1.4_8 NodeMcu電路接線圖
◎ 程式列表與說明:
#include "WiFiConnect.h" //include before SSD1306.h if using custom fonts
#include <Wire.h>
#include <Adafruit_GFX.h>
#include <Adafruit_SSD1306.h>
#include "image.h"
#include "index.h"
WiFiServer server(80);
WiFiClient client;
WiFiConnect wc; // 宣告一WiFiConnect類別物件變數
#define SCREEN_WIDTH 128 // OLED display width, in pixels
#define SCREEN_HEIGHT 64 // OLED display height, in pixels
Adafruit_SSD1306 display(SCREEN_WIDTH, SCREEN_HEIGHT, &Wire, -1);
String softSsidChip = "ESP"+String(ESP.getChipId());
const byte indLED=2; // ESP系列模組郵票板指示用LED腳位
const byte ledOn=1;
const byte ledOff=0;
const byte LED=2,Led1=12,Led2=15,Led3=13;
String Uri;
String mainPage;
String html_Led1On="<form action='Led1On'><input class='button' type='submit' value='點亮LED1'></form><br>";
String html_Led1Off="<form action='Led1Off'><input class='button2' type='submit' value='熄滅LED1'></form><br>";
String html_Led2On="<form action='Led2On'><input class='button' type='submit' value='點亮LED2'></form><br>";
String html_Led2Off="<form action='Led2Off'><input class='button2' type='submit' value='熄滅LED2'></form><br>";
String html_Led3On="<form action='Led3On'><input class='button' type='submit' value='點亮LED3'></form><br>";
String html_Led3Off="<form action='Led3Off'><input class='button2' type='submit' value='熄滅LED3'></form><br>";
String html_end="</div></body></html>";
String html_Echo="";
String ledState="<h3>LED目前狀態 : 熄滅</h3><h4><br></h4>";;
boolean ledStates[]={false,false,false};
// 連線設定回應副程式:
void configModeCallback(WiFiConnect *mWiFiConnect) {
Serial.println("Entering Access Point!");
Serial.println("進入 AP 存取點模式!");
}
// WiFi連線副程式 :
void startWiFi(boolean showParams = false) {
wc.setDebug(true);
// 設定連線回應副程式
wc.setAPCallback(configModeCallback);
/*
AP_NONE = Continue executing code --> 繼續往下執行
AP_LOOP = Trap in a continuous loop --> 進入無窮AP設定迴圈莊太
AP_RESET = Restart the chip --> 啟動晶片重置動作
*/
// ESP系列模組進入存取點(Access Point)模式畫面:
if ( !wc.autoConnect()) { // try to connect to wifi
// 測試ESPXX系列晶片有沒有再自動連上WiFi分享器
LED_Blink(5,300);
wc.startConfigurationPortal(AP_LOOP);//if not connected show the configuration portal
}
} // WiFi連線副程式結束
// setuo()初始化程式開始:
void setup() {
Serial.begin(115200);
pinMode(indLED,OUTPUT);
digitalWrite(indLED,1);
pinMode(Led1,OUTPUT); // 設定GPIO12,13,15三隻腳為輸出
pinMode(Led2,OUTPUT);
pinMode(Led3,OUTPUT);
for (int i=0;i<3;i++)
ledStates[i]=false;
Serial.println();
Serial.println("Program Start!");
Serial.println("程式開始!");
// initialize with the I2C addr 0x3C
if(display.begin(SSD1306_SWITCHCAPVCC, 0x3C)) // Address 0x3D for 128x64
{
Serial.println("SSD1036 OLED allocation Successed!");
Serial.println("SSD1306 初始化成功!");
}
else {
Serial.println("SSD1306 allocation failed!");
Serial.println("SSD1306 初始化失敗");
for(;;);
}
// Draw bitmap on the screen
display.clearDisplay();
display.setTextSize(2);
display.setTextColor(WHITE);
display.setCursor(0,0);
display.println("");
display.println(" Program ");
display.println(" Start!");
display.display();
delay(2000);
Serial.printf("\nAnalog in = %d\n",analogRead(A0));
// 啟動WiFi連線參數清除
// wc.resetSettings(); //helper to remove the stored wifi connection, comment out after first upload and re upload
// 在螢幕上畫出WiFi圖片
display.clearDisplay();
display.drawBitmap(30, 0, WiFiMap2, 70, 40, WHITE);
display.setTextSize(1);
display.setTextColor(WHITE);
display.setCursor(0,46);
display.println(" Waiting for");
display.println(" Connection...");
display.display();
// 啟動WiFi連線副程式
startWiFi();
Serial.print("Cnnect to : ");
Serial.println(WiFi.SSID());
Serial.print("ESP已連接至:");
Serial.println(WiFi.SSID());
display.clearDisplay();
// Draw bitmap on the screen
display.drawBitmap(30, 0, WiFiMap2, 70, 40, WHITE);
display.setTextSize(1);
display.setTextColor(WHITE);
display.setCursor(0,40);
display.println("ESP Connect to :");
display.print(" ");
display.println(WiFi.SSID());
display.print(" IP:");
display.println(WiFi.localIP());
display.display();
// WiFi連線成功 :
delay(3000);
Serial.println();
Serial.print("WiFi Connected, IP address: ");
Serial.println(WiFi.localIP());
Serial.print("連線成功, 本地WiFi的IP位址為 : ");
Serial.println(WiFi.localIP());
Serial.println();
LED_Blink(5,400);
delay(1000);
server.begin();
display.clearDisplay();
display.setTextSize(2);
display.setCursor(0,16);
display.println(" System");
display.println(" Ready!");
display.display();
} // setuo()初始化程式結束
// loop()主迴圈程式開始:
void loop() {
client=server.available();
if(!client)
return;
String request="",requests="";
while(client.connected())
{
request=client.readStringUntil('\r');
requests+=request;
if(request=="\n")
break;
}
client.flush();
Serial.println("Request end!");
Uri=requests.substring(requests.indexOf("/"),requests.indexOf("HTTP"));
Uri.trim();
Serial.print("Uri = '");
Serial.print(Uri);
Serial.println("'");
String URI=Uri;
Serial.println(URI);
if(URI.indexOf("/Led1On")==0) // 測試URI是否為點亮LED1指令
{ // URI為點亮LED1指令
ledStates[0]=true; // 設定LED1狀態為點亮
digitalWrite(Led1,ledOn); // 點亮LED1
Serial.println("LED1 is : On");
drawLedOnOff(1);
}
else if (URI.indexOf("/Led1Off")==0) // 測試URI是否為熄滅LED1指令
{ // URI為熄滅LED1指令
ledStates[0]=false; // 設定LED1狀態為點亮
digitalWrite(Led1,ledOff); // 熄滅LED1
Serial.println("LED1 is : Off");
drawLedOnOff(1);
}
else if(URI.indexOf("/Led2On")==0) // 測試URI是否為點亮LED2指令
{ // URI為點亮LED2指令
ledStates[1]=true; // 設定LED1狀態為點亮
digitalWrite(Led2,ledOn); // 點亮LED2
Serial.println("LED2 is : On");
drawLedOnOff(2);
}
else if (URI.indexOf("/Led2Off")==0) // 測試URI是否為熄滅LED2指令
{ // URI熄滅LED2指令
ledStates[1]=false; // 設定LED1狀態為點亮
digitalWrite(Led2,ledOff); // 熄滅LED2
Serial.println("LED2 is : Off");
drawLedOnOff(2);
}
else if(URI.indexOf("/Led3On")==0) // 測試URI是否為點亮LED3指令
{ // URI點亮LED3指令
ledStates[2]=true; // 設定LED1狀態為點亮
digitalWrite(Led3,ledOn); // 點亮LED3
Serial.println("LED3 is : On");
drawLedOnOff(3);
}
else if (URI.indexOf("/Led3Off")==0) // 測試URI是否為熄滅LED3指令
{ // URI為熄滅LED2指令
ledStates[2]=false; // 設定LED1狀態為點亮
digitalWrite(Led3,ledOff); // 熄滅LED3
Serial.println("LED3 is : Off");
drawLedOnOff(3);
}
else if (URI.indexOf("/")==0) // 測試是否為網頁首頁URI
{
digitalWrite(Led1,ledOff); // 熄滅LED1
digitalWrite(Led2,ledOff); // 熄滅LED2
digitalWrite(Led3,ledOff); // 熄滅LED3
Serial.println("Web Home page!");
drawLedOnOff(0);
}
Serial.println();
delay(5);
mainPage=MAIN_page; // 取得網頁首頁程式的前半部分
if (ledStates[0]){ // 測試LED1的設定狀態
// LED1狀態為點亮
mainPage+="<h3>LED1目前狀態 : 點亮</h3>";;
mainPage+=html_Led1Off;
} else {
// LED1狀態為熄滅
mainPage+="<h3>LED1目前狀態 : 熄滅</h3>";;
mainPage+=html_Led1On;
}
if (ledStates[1]){ // 測試LED2的設定狀態
// LED2狀態為點亮
mainPage+="<h3>LED2目前狀態 : 點亮</h3>";;
mainPage+=html_Led2Off;
} else {
// LED2狀態為熄滅
mainPage+="<h3>LED1目前狀態 : 熄滅</h3>";;
mainPage+=html_Led2On;
}
if (ledStates[2]){ // 測試LED3的設定狀態
// LED3狀態為點亮
mainPage+="<h3>LED3目前狀態 : 點亮</h3>";;
mainPage+=html_Led3Off;
} else {
// LED3狀態為熄滅
mainPage+="<h3>LED3目前狀態 : 熄滅</h3>";;
mainPage+=html_Led3On;
}
mainPage+=html_end; // 加上網頁結束html語法
client.print(mainPage); // 送出回應網頁html檔案
client.println();
client.flush(); // 將客戶端裝置傳送來的資料清空
delay(10);
} // loop()主迴圈程式結束
// 顯示3顆LED的亮滅狀態:
void drawLedOnOff(byte ledNum) {
display.clearDisplay();
for(int i=0;i<3;i++)
{
if(ledStates[i])
display.drawBitmap(i*43, 0, LED_ON, 42, 46, WHITE);
else
display.drawBitmap(i*43, 0, LED_OFF, 42, 46, WHITE);
}
display.setTextSize(2);
display.setCursor(0,49);
if (ledNum==0)
display.println(" Home Page");
else {
display.print(" LED ");
display.print(ledNum);
if(ledStates[ledNum-1]==1)
display.println(" On!");
else
display.println(" Off!");
}
display.display();
}
// 讓指示LED快閃count次,亮滅時間為dTime秒
void LED_Blink(int count,int dTime)
{
for(int i=0;i<count;i++)
{
digitalWrite(indLED,0);
delay(dTime);
digitalWrite(indLED,1);
delay(200);
}
}
// 以下部分為「index.h」標籤頁面的內容:
const char MAIN_page[] PROGMEM = R"=====(
<!DOCTYPE html>
<html>
<head>
<meta name='viewport' content='width=device-width, initial-scale=1.0'/>
<meta charset='utf-8'> <link rel='icon' href='data:,\'>
<style>body {font-size:110%;} #main {display:table; margin:auto;
padding:0 10px 0 10px;} h3,{text-align:center;} h4,{text-align:center;}
.button {padding:10px 10px 10px 10px; width:100%; background-color:pink; font-size:120%;}
.button2 {padding:10px 10px 10px 10px; width:100%; background-color:yellowgreen; font-size:120%;}
</style>
</head>
<body>
<div id='main'>
<h3>3顆LED亮滅控制示範</h3>
)=====";
// 以下部分為「image.h」標籤頁面的內容:
// '319-3192981_free-wifi-svg-png-icon-free-download-free', 70x40px
const unsigned char WiFiMap2 [] PROGMEM = {
0x00, 0x00, 0x00, 0x00, 0x00, 0x00, 0x00, 0x00, 0x00, 0x00, 0x00, 0x00, 0x00, 0x00, 0x00, 0x00,
0x00, 0x00, 0x00, 0x00, 0x00, 0x00, 0x20, 0x00, 0x00, 0x00, 0x00, 0x00, 0x00, 0x00, 0x7f, 0xff,
0xfc, 0x00, 0x00, 0x00, 0x00, 0x00, 0x0f, 0xff, 0xff, 0xff, 0xc0, 0x00, 0x00, 0x00, 0x00, 0x7f,
0xff, 0xff, 0xff, 0xf8, 0x00, 0x00, 0x00, 0x01, 0xff, 0xe0, 0x00, 0x1f, 0xff, 0x00, 0x00, 0x00,
0x0f, 0xfc, 0x00, 0x00, 0x00, 0xff, 0xc0, 0x00, 0x00, 0x3f, 0xe0, 0x00, 0x00, 0x00, 0x1f, 0xf0,
0x00, 0x00, 0xff, 0x00, 0x00, 0x00, 0x00, 0x03, 0xfc, 0x00, 0x01, 0xfc, 0x00, 0x00, 0x00, 0x00,
0x00, 0xfe, 0x00, 0x07, 0xf0, 0x00, 0x00, 0x00, 0x00, 0x00, 0x3f, 0x80, 0x0f, 0xc0, 0x00, 0x1f,
0xff, 0xf0, 0x00, 0x0f, 0xc0, 0x1f, 0x80, 0x01, 0xff, 0xff, 0xfe, 0x00, 0x07, 0xe0, 0x3f, 0x00,
0x0f, 0xff, 0xff, 0xff, 0xc0, 0x01, 0xf0, 0x3c, 0x00, 0x3f, 0xf8, 0x00, 0x3f, 0xf0, 0x00, 0xf0,
0x18, 0x00, 0xff, 0x80, 0x00, 0x07, 0xfc, 0x00, 0x60, 0x00, 0x03, 0xfc, 0x00, 0x00, 0x00, 0xff,
0x00, 0x00, 0x00, 0x07, 0xf0, 0x00, 0x00, 0x00, 0x3f, 0x80, 0x00, 0x00, 0x0f, 0xc0, 0x00, 0x00,
0x00, 0x0f, 0xc0, 0x00, 0x00, 0x1f, 0x80, 0x00, 0x00, 0x00, 0x07, 0xe0, 0x00, 0x00, 0x3e, 0x00,
0x07, 0xff, 0x80, 0x01, 0xf0, 0x00, 0x00, 0x1c, 0x00, 0x3f, 0xff, 0xf0, 0x00, 0xe0, 0x00, 0x00,
0x00, 0x00, 0xff, 0xff, 0xfc, 0x00, 0x00, 0x00, 0x00, 0x00, 0x03, 0xfe, 0x01, 0xff, 0x00, 0x00,
0x00, 0x00, 0x00, 0x07, 0xf0, 0x00, 0x3f, 0x80, 0x00, 0x00, 0x00, 0x00, 0x0f, 0xc0, 0x00, 0x0f,
0xc0, 0x00, 0x00, 0x00, 0x00, 0x1f, 0x80, 0x00, 0x03, 0xe0, 0x00, 0x00, 0x00, 0x00, 0x1e, 0x00,
0x00, 0x01, 0xe0, 0x00, 0x00, 0x00, 0x00, 0x0c, 0x00, 0x00, 0x00, 0xc0, 0x00, 0x00, 0x00, 0x00,
0x00, 0x00, 0x00, 0x00, 0x00, 0x00, 0x00, 0x00, 0x00, 0x00, 0x00, 0x00, 0x00, 0x00, 0x00, 0x00,
0x00, 0x00, 0x00, 0x00, 0xfc, 0x00, 0x00, 0x00, 0x00, 0x00, 0x00, 0x00, 0x01, 0xfe, 0x00, 0x00,
0x00, 0x00, 0x00, 0x00, 0x00, 0x01, 0xfe, 0x00, 0x00, 0x00, 0x00, 0x00, 0x00, 0x00, 0x01, 0xfe,
0x00, 0x00, 0x00, 0x00, 0x00, 0x00, 0x00, 0x01, 0xfe, 0x00, 0x00, 0x00, 0x00, 0x00, 0x00, 0x00,
0x00, 0xfc, 0x00, 0x00, 0x00, 0x00, 0x00, 0x00, 0x00, 0x00, 0x00, 0x00, 0x00, 0x00, 0x00, 0x00,
0x00, 0x00, 0x00, 0x00, 0x00, 0x00, 0x00, 0x00
};
// 'WiFi_AP4', 55x35px
const unsigned char WiFi_AP4 [] PROGMEM = {
0xff, 0xff, 0xff, 0xff, 0xff, 0xff, 0xfe, 0xff, 0xff, 0xff, 0xff, 0xff, 0xff, 0xfe, 0xff, 0xff,
0xff, 0xfe, 0x7f, 0xff, 0x9e, 0xff, 0xff, 0xff, 0xfc, 0x7f, 0xff, 0x8e, 0xff, 0xff, 0xff, 0xf8,
0xe7, 0xf9, 0xc6, 0xff, 0xff, 0xff, 0xf9, 0xc7, 0xf8, 0xe6, 0xff, 0xff, 0xff, 0xf1, 0xcf, 0x3c,
0xe6, 0xff, 0xff, 0xff, 0xf3, 0x8e, 0x0c, 0x62, 0xff, 0xff, 0xff, 0xf3, 0x8e, 0x0e, 0x62, 0xff,
0xff, 0xff, 0xf1, 0xce, 0x1c, 0xe2, 0xff, 0xff, 0xff, 0xf9, 0xcf, 0x3c, 0xe6, 0xff, 0xff, 0xff,
0xf9, 0xe7, 0x39, 0xc6, 0xff, 0xff, 0xff, 0xfc, 0xff, 0x3f, 0xce, 0xff, 0xff, 0xff, 0xfe, 0x7f,
0x3f, 0x9e, 0xff, 0xff, 0xff, 0xff, 0xff, 0x3f, 0xfe, 0xff, 0xff, 0xff, 0xff, 0xff, 0x3f, 0xfe,
0xff, 0xff, 0xff, 0xff, 0xff, 0x3f, 0xfe, 0xff, 0xff, 0xff, 0xff, 0xff, 0x3f, 0xfe, 0xff, 0xff,
0xff, 0xff, 0xff, 0x3f, 0xfe, 0xff, 0xff, 0xff, 0xff, 0xff, 0x3f, 0xfe, 0xff, 0xff, 0xff, 0xff,
0xff, 0x3f, 0xfe, 0xff, 0xff, 0xff, 0xff, 0xff, 0x3f, 0xfe, 0xff, 0xff, 0xff, 0xff, 0xff, 0x3f,
0xfe, 0xc0, 0x00, 0x00, 0x00, 0x00, 0x00, 0x0e, 0x8f, 0xff, 0xff, 0xff, 0xff, 0xff, 0xe6, 0x8f,
0xff, 0xff, 0xff, 0xff, 0xff, 0xe6, 0x8f, 0xff, 0xff, 0xf9, 0xf3, 0xf3, 0xe6, 0x8f, 0xff, 0xff,
0xe0, 0xe0, 0xc1, 0xe6, 0x8e, 0x00, 0x01, 0xe0, 0xe4, 0xc0, 0xe6, 0x8f, 0xff, 0xff, 0xf0, 0xf1,
0xe1, 0xe6, 0x8f, 0xff, 0xff, 0xff, 0xff, 0xff, 0xe6, 0x8f, 0xff, 0xff, 0xff, 0xff, 0xff, 0xe6,
0xc0, 0x00, 0x00, 0x00, 0x00, 0x00, 0x06, 0xff, 0xff, 0xff, 0xff, 0xff, 0xff, 0xfe, 0xff, 0xff,
0xff, 0xff, 0xff, 0xff, 0xfe
};
// 'led-light-bulb-diode-512', 42x46px
const unsigned char LED_ON [] PROGMEM = {
0xff, 0xff, 0xf3, 0xff, 0xff, 0xc0, 0xff, 0xff, 0xf3, 0xff, 0xff, 0xc0, 0xff, 0xff, 0xf3, 0xff,
0xff, 0xc0, 0xff, 0xff, 0xf3, 0xff, 0xff, 0xc0, 0xff, 0xff, 0xf3, 0xff, 0xff, 0xc0, 0xff, 0xff,
0xff, 0xff, 0xff, 0xc0, 0xfc, 0xff, 0xff, 0xff, 0xcf, 0xc0, 0xfc, 0x7f, 0xff, 0xff, 0x8f, 0xc0,
0xfe, 0x3f, 0xff, 0xff, 0x1f, 0xc0, 0xff, 0x3f, 0xff, 0xff, 0x3f, 0xc0, 0xff, 0xff, 0xff, 0xff,
0xff, 0xc0, 0xff, 0xff, 0x80, 0x7f, 0xff, 0xc0, 0xff, 0xfe, 0x00, 0x1f, 0xff, 0xc0, 0xff, 0xfc,
0x1e, 0x0f, 0xff, 0xc0, 0xff, 0xf8, 0x7f, 0x87, 0xff, 0xc0, 0xff, 0xf1, 0xff, 0xe3, 0xff, 0xc0,
0xff, 0xf1, 0xff, 0xe3, 0xff, 0xc0, 0xff, 0xe3, 0xff, 0xf1, 0xff, 0xc0, 0xff, 0xe3, 0xff, 0xf1,
0xff, 0xc0, 0xff, 0xe7, 0xff, 0xf9, 0xff, 0xc0, 0x07, 0xe7, 0xff, 0xf9, 0xf8, 0x00, 0x07, 0xc7,
0xff, 0xf8, 0xf8, 0x00, 0xff, 0xc7, 0xff, 0xf8, 0xff, 0xc0, 0xff, 0xc7, 0xff, 0xf8, 0xff, 0xc0,
0xff, 0xc7, 0xff, 0xf8, 0xff, 0xc0, 0xff, 0xc7, 0xff, 0xf8, 0xff, 0xc0, 0xff, 0xc7, 0xff, 0xf8,
0xff, 0xc0, 0xff, 0xc7, 0xff, 0xf8, 0xff, 0xc0, 0xff, 0xc7, 0xff, 0xf8, 0xff, 0xc0, 0xff, 0x00,
0x00, 0x00, 0x3f, 0xc0, 0xff, 0x00, 0x00, 0x00, 0x3f, 0xc0, 0xff, 0x80, 0x00, 0x00, 0x7f, 0xc0,
0xff, 0xf8, 0xff, 0xc7, 0xff, 0xc0, 0xff, 0xf8, 0xff, 0xc7, 0xff, 0xc0, 0xff, 0xf8, 0xff, 0xc7,
0xff, 0xc0, 0xff, 0xf8, 0xff, 0xc7, 0xff, 0xc0, 0xff, 0xf8, 0xff, 0xc7, 0xff, 0xc0, 0xff, 0xf8,
0xff, 0xc7, 0xff, 0xc0, 0xff, 0xf8, 0xff, 0xc7, 0xff, 0xc0, 0xff, 0xf8, 0xff, 0xc7, 0xff, 0xc0,
0xff, 0xf8, 0xff, 0xc7, 0xff, 0xc0, 0xff, 0xf9, 0xff, 0xe7, 0xff, 0xc0, 0xff, 0xff, 0xff, 0xff,
0xff, 0xc0, 0xff, 0xff, 0xff, 0xff, 0xff, 0xc0, 0xff, 0xff, 0xff, 0xff, 0xff, 0xc0, 0xff, 0xff,
0xff, 0xff, 0xff, 0xc0
};
// 'led-variant-off2', 42x46px
const unsigned char LED_OFF [] PROGMEM = {
0xff, 0xff, 0xff, 0xff, 0xff, 0xc0, 0xff, 0xff, 0xc0, 0xff, 0xff, 0xc0, 0xff, 0xff, 0x00, 0x1f,
0xff, 0xc0, 0xff, 0xfe, 0x00, 0x0f, 0xff, 0xc0, 0x7f, 0xfc, 0x00, 0x07, 0xff, 0xc0, 0x3f, 0xf8,
0x00, 0x03, 0xff, 0xc0, 0x1f, 0xf0, 0x00, 0x03, 0xff, 0xc0, 0x0f, 0xf0, 0x00, 0x01, 0xff, 0xc0,
0x07, 0xf0, 0x00, 0x01, 0xff, 0xc0, 0x03, 0xf8, 0x00, 0x01, 0xff, 0xc0, 0x81, 0xfc, 0x00, 0x01,
0xff, 0xc0, 0xc0, 0xfe, 0x00, 0x01, 0xff, 0xc0, 0xe0, 0x7f, 0x00, 0x01, 0xff, 0xc0, 0xf0, 0x1f,
0x80, 0x01, 0xff, 0xc0, 0xf8, 0x0f, 0xc0, 0x01, 0xff, 0xc0, 0xfc, 0x07, 0xe0, 0x01, 0xff, 0xc0,
0xfe, 0x03, 0xf0, 0x01, 0xff, 0xc0, 0xff, 0x81, 0xf8, 0x01, 0xff, 0xc0, 0xff, 0xc0, 0xfc, 0x01,
0xff, 0xc0, 0xff, 0xe0, 0x7e, 0x01, 0xff, 0xc0, 0xff, 0xe0, 0x3f, 0x01, 0xff, 0xc0, 0xff, 0xe0,
0x1f, 0x81, 0xff, 0xc0, 0xff, 0xe0, 0x0f, 0xc1, 0xff, 0xc0, 0xff, 0xf0, 0x07, 0xe1, 0xff, 0xc0,
0xfe, 0x00, 0x03, 0xf0, 0x0f, 0xc0, 0xfe, 0x00, 0x01, 0xf8, 0x0f, 0xc0, 0xfe, 0x00, 0x00, 0xfc,
0x0f, 0xc0, 0xfe, 0x00, 0x00, 0x7f, 0x0f, 0xc0, 0xfe, 0x00, 0x00, 0x3f, 0x8f, 0xc0, 0xff, 0xfc,
0x18, 0x1f, 0xff, 0xc0, 0xff, 0xfc, 0x1c, 0x0f, 0xff, 0xc0, 0xff, 0xfc, 0x1e, 0x07, 0xff, 0xc0,
0xff, 0xfc, 0x1f, 0x01, 0xff, 0xc0, 0xff, 0xfc, 0x1f, 0x00, 0xff, 0xc0, 0xff, 0xfc, 0x1f, 0x00,
0x7f, 0xc0, 0xff, 0xfc, 0x1f, 0x00, 0x3f, 0xc0, 0xff, 0xfc, 0x1f, 0x00, 0x1f, 0xc0, 0xff, 0xfc,
0x1f, 0x04, 0x0f, 0xc0, 0xff, 0xfc, 0x1f, 0x06, 0x07, 0xc0, 0xff, 0xfc, 0x1f, 0x07, 0x03, 0xc0,
0xff, 0xfc, 0x1f, 0x07, 0x81, 0xc0, 0xff, 0xfc, 0x1f, 0x07, 0xc0, 0xc0, 0xff, 0xfc, 0x1f, 0x07,
0xe0, 0x40, 0xff, 0xff, 0xff, 0xff, 0xf0, 0xc0, 0xff, 0xff, 0xff, 0xff, 0xf9, 0xc0, 0xff, 0xff,
0xff, 0xff, 0xff, 0xc0};
程式名稱:ESP_CH7_2_4_3but1.ino
本範例程式主要是前一章《softAP_6_5_3Led1.ino》與【七.1-4】小節的《ESP_CH7_AutoConnectOLED20.ino》兩個程式的組合,開始的1~43行是所有會使用到變數定義區,而標籤頁「index.h」(放在程式列表的311~327行)中的內容是在實作《softAP_6_5_3Led_form.html》這個html網頁程式的前半段(1~16行),第24行則定義了3顆LED所使用的腳位(GPIO 12,13,15),然後把三個表單按鈕的html語言部分,以27~38行的6個字串變數(即“html_LedOn1”~ “html_LedOn3”和”html_LedOff1”~”html_LedOff3”)來取代。
由於我們所使用的OLED顯示器解析度只有128X64 pixels,如果直接使用上一小節的LED On/Off貼圖資料,則螢幕將會無法同時放上三個圖案畫面,所以在標籤頁「image.h」(放在程式列表的378~418行)中的LED On/Off貼圖資料大小已經調整為42X46 pixels;這樣一來OLED顯示器的上方便可以同時顯示三張圖案,而且下方還有一個可以容納尺寸為2字數為10的文字訊息區。
至於52~69行的WiFi連線副程式『void startWiFi()』與72~157行的初始化程式區(setup()),則是直接沿用上面【七.2-3】小節的《ESP_CH7_2_3_but1.ino》程式(37~143行)。
在主迴圈程式(loop())開始的162~183行,同樣是在等待客戶端瀏覽器連線或控制信號的到來,如果有,會將傳來的URI內容列印在序列監控視窗上;接下來的184~233行是一連串的測試與判斷過程,看看客戶端傳送過來指令為何﹖
以下面這一段程式來說,如果測試正確,會先令對應的LED狀態變數也就是「ledStates[]」這個布林陣列設定為真(186行),並點亮該LED(在此為LED1),然後呼叫『drawLedOnOff(1)』這個副程式去處理跟OLED顯示器有關的部分,剩下其他部分程式動作的流程都一樣!
184. if(URI.indexOf("/Led1On")==0) // 測試URI是否為點亮LED1指令
185. { // URI為點亮LED1指令
186. ledStates[0]=true; // 設定LED1狀態為點亮
187. digitalWrite(Led1,ledOn); // 點亮LED1
188. Serial.println("LED1 is : On");
189. drawLedOnOff(1);
190. }
接著的236~263行程式,會依前面URI的測試與判斷所得到的LED狀態變數陣列「LedState[]」結果,去完成最後要送回給客戶端的html回應程式,也就是實作出《softAP_6_5_3Led_form.html》這個html網頁程式的正確內容。
在這個範例中我們新增加了一個專門用來在OLED顯示器上顯示3顆LED亮滅狀態的副程式:『drawLedOnOff()』(271~295行),這個副程式會依照「ledStates[]」這個布林陣列的內容,在OLED顯示器的上方顯示三張代表LED亮或滅的圖案;由於OLED顯示器的螢幕比較小,而且已經有圖案可以表LED的狀態,所以在此只在螢幕下方以文字的方式顯示最近一次的動作內容,而不是三顆LED的狀態。
◎ 執行結果:
前面的【圖七、2-1.4_2】至【圖七、2-1.4_6】即為本範例程式執行的結果,其中包括了手機端瀏覽器與ESP8266模組端OLED顯示器畫面的截圖,而下面的影片則是完整的使用與操作過程,請自行去點閱參考。
沒有留言:
張貼留言