在之前的【四.10-5 OLED顯示器綜合顯示實習—WiFi連線相關畫面設計】小節中,曾以ESPXX系列模組自動連接WiFi分享器的場景,設計一些可能用到的UI介面圖像,以作為該章節的結束。在這個小節中將示範如何將其內容實際應用到前面的使用者自行選擇及設定WiFi分享器的功能上,也就是將連線過程中的圖示畫面改成使用Adafruit的OLED顯示器函示庫去實現它。
◎ 功能與動作說明:
1、本範例和上一小節的範例功能類似,都在建構一具有0.96”OLED顯示器,且可由使用者自行選定所要使用的WiFi分享器之ESPXX系列晶片IOT物聯網系統,此系統可使用ESP8266系列或是ESP32系列的晶片模組,主要的差別在於晶片端多了一個可以顯示連線狀態的OLED顯示器,而且使用的是Adafruit的OLED顯示器函示庫。
2、此系統在開機時會自行連上最後一次連線的WiFi分享器,此時OLED顯示器會顯示【圖七•1-4_1】的畫面,提醒使用者目前系統連線中,如果連線失敗則會跳到【圖七•1-4_2】的畫面,也就是進入本地AP模式(IP預設為:192.168.4.1),而且會顯示這個AP分享點的名稱;為了避免多個ESPXX晶片在同一個場域使用以至於出現同樣名稱的問題,在此都會以”ESP”加上該晶片內建的晶片序號作為此AP的名稱,這樣就不會混淆了!

圖七•1-4_1 ESPXX晶片模組板開機連線WiFi分享器畫面

圖七•1-4_2 ESPXX晶片模組板進入本地AP模式設定畫面
3、不管是一開始就連線成功,或是由使用者設定,在連上了目標WiFi分享器後,會看到下列的畫面,其中包括了連上的WiFi分享器名稱,及分配到的本地IP位址。
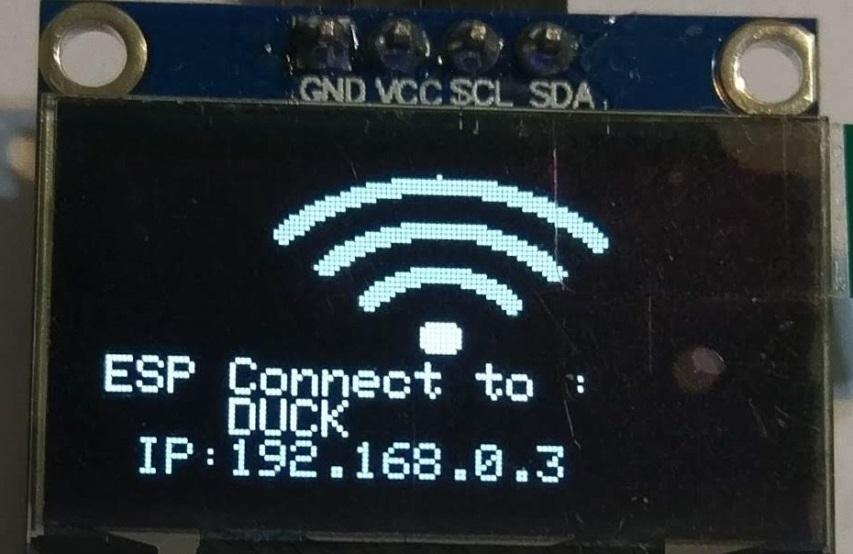
圖七•1-4_3 ESPXX晶片模組板連線成功畫面
◎電路圖:
本此範例的電路圖與上一小節完全相同,不必更改。
◎ 程式列表與說明:
#include "WiFiConnect.h"
#include <Wire.h>
#include <Adafruit_GFX.h>
#include <Adafruit_SSD1306.h>
#include "image.h"
#include "image2.h"
#ifdef ESP32 // 測試使否使用ESP32系列晶片
int ledOn=1;
int ledOff=0;
#else // 或是使用ESP8266系列晶片
int ledOn=0;
int ledOff=1;
#endif
WiFiConnect wc; // 宣告一WiFiConnect類別物件變數
#define SCREEN_WIDTH 128 // OLED display width, in pixels
#define SCREEN_HEIGHT 64 // OLED display height, in pixels
Adafruit_SSD1306 display(SCREEN_WIDTH, SCREEN_HEIGHT, &Wire, -1);
String softSsidChip = "ESP"+String(ESP.getChipId());
const byte indLED=2; // ESP系列模組郵票板指示用LED腳位
// 連線設定回應副程式:
void configModeCallback(WiFiConnect *mWiFiConnect) {
Serial.println("Entering Access Point!");
Serial.println("進入 AP 存取點模式!");
}
// WiFi連線副程式 :
void startWiFi(boolean showParams = false) {
wc.setDebug(true);
// 設定連線回應副程式
wc.setAPCallback(configModeCallback);
// 啟動WiFi連線參數清除
// wc.resetSettings();
// ESP系列模組進入存取點(Access Point)模式畫面:
if ( !wc.autoConnect()) { // try to connect to wifi
display.clearDisplay();
// Draw bitmap on the screen
display.drawBitmap(0, 28, WiFi_AP4, 55, 35, WHITE);
display.setTextSize(1);
display.setTextColor(WHITE);
display.setCursor(0,0);
display.println(" Access Point Mode!");
display.setTextSize(2);
display.setCursor(0,10);
display.println(softSsidChip);
display.setTextSize(1);
display.setCursor(58,35);
display.println(" Local IP=");
display.setCursor(58,45);
display.println("192.168.4.1");
display.display();
// 測試ESPXX系列晶片有沒有自動連上WiFi分享器
LED_Blink(5,300);
wc.startConfigurationPortal(AP_LOOP);//如果晶片沒連線則進入設定模式
}
} // WiFi連線副程式結束
// 初始化程式區開始:
void setup() {
Serial.begin(115200);
pinMode(indLED,OUTPUT);
digitalWrite(indLED,ledOff);
Serial.println();
Serial.println("Program Start!");
Serial.println("程式開始!");
// initialize with the I2C addr 0x3C
if(display.begin(SSD1306_SWITCHCAPVCC, 0x3C)) //
{
Serial.println("SSD1036 OLED allocation Successed!");
Serial.println("SSD1306 初始化成功!");
}
else {
Serial.println("SSD1306 allocation failed!");
Serial.println("SSD1306 初始化失敗");
for(;;);
}
// 在OLED顯示器上顯示”Program Start!”訊息:
display.clearDisplay();
display.setTextSize(2);
display.setTextColor(WHITE);
display.setCursor(0,0);
display.println("");
display.println(" Program ");
display.println(" Start!");
display.display();
delay(2000);
//在OLED顯示器上貼上WiFi圖形
display.clearDisplay();
display.drawBitmap(30, 0, WiFiMap2, 70, 40, WHITE);
display.setTextSize(1);
display.setTextColor(WHITE);
display.setCursor(0,46);
display.println(" Waiting for");
display.println(" Connection...");
display.display();
// 啟動WiFi連線副程式
startWiFi();
Serial.print("Cnnect to : ");
Serial.println(WiFi.SSID());
Serial.print("ESP已連接至:");
Serial.println(WiFi.SSID());
display.clearDisplay();
// Draw bitmap on the screen
display.drawBitmap(30, 0, WiFiMap2, 70, 40, WHITE);
display.setTextSize(1);
display.setTextColor(WHITE);
display.setCursor(0,40);
display.println("ESP Connect to :");
display.print(" ");
display.println(WiFi.SSID());
display.print(" IP:");
display.println(WiFi.localIP());
display.display();
// WiFi連線成功 :
delay(3000);
Serial.println();
Serial.print("WiFi Connected, IP address: ");
Serial.println(WiFi.localIP());
Serial.print("連線成功, 本地WiFi的IP位址為 : ");
Serial.println(WiFi.localIP());
Serial.println();
LED_Blink(5,400);
delay(1000);
digitalWrite(indLED,ledOn); // 最後讓指示LED恆亮代表已經連線成功
delay(1000);
} // 初始化程式區結束
// 主迴圈程式區開始:
void loop() {
delay(100);
// 如果在主程式中發現WiFi連線斷開,令系統重置重新開始!
if (WiFi.status() != WL_CONNECTED) {
if (!wc.autoConnect()) wc.startConfigurationPortal(AP_RESET);
}
} // 主迴圈程式區結束
// 讓指示LED快閃count次,亮滅時間為dTime秒
void LED_Blink(int count,int dTime)
{
for(int i=0;i<count;i++)
{
digitalWrite(indLED,ledOn);
delay(dTime);
digitalWrite(indLED,ledOff);
delay(200);
}
}
// WiFi圖形引入檔”image.h”內容:
// '319-3192981_free-wifi-svg-png-icon-free-download-free', 70x40px
const unsigned char WiFiMap2 [] PROGMEM = {
0x00, 0x00, 0x00, 0x00, 0x00, 0x00, 0x00, 0x00, 0x00, 0x00, 0x00, 0x00, 0x00, 0x00, 0x00, 0x00, 0x00, 0x00, 0x00, 0x00, 0x00, 0x00, 0x20, 0x00, 0x00, 0x00, 0x00, 0x00, 0x00, 0x00, 0x7f, 0xff, 0xfc, 0x00, 0x00, 0x00, 0x00, 0x00, 0x0f, 0xff, 0xff, 0xff, 0xc0, 0x00, 0x00, 0x00, 0x00, 0x7f, 0xff, 0xff, 0xff, 0xf8, 0x00, 0x00, 0x00, 0x01, 0xff, 0xe0, 0x00, 0x1f, 0xff, 0x00, 0x00, 0x00, 0x0f, 0xfc, 0x00, 0x00, 0x00, 0xff, 0xc0, 0x00, 0x00, 0x3f, 0xe0, 0x00, 0x00, 0x00, 0x1f, 0xf0, 0x00, 0x00, 0xff, 0x00, 0x00, 0x00, 0x00, 0x03, 0xfc, 0x00, 0x01, 0xfc, 0x00, 0x00, 0x00, 0x00, 0x00, 0xfe, 0x00, 0x07, 0xf0, 0x00, 0x00, 0x00, 0x00, 0x00, 0x3f, 0x80, 0x0f, 0xc0, 0x00, 0x1f, 0xff, 0xf0, 0x00, 0x0f, 0xc0, 0x1f, 0x80, 0x01, 0xff, 0xff, 0xfe, 0x00, 0x07, 0xe0, 0x3f, 0x00, 0x0f, 0xff, 0xff, 0xff, 0xc0, 0x01, 0xf0, 0x3c, 0x00, 0x3f, 0xf8, 0x00, 0x3f, 0xf0, 0x00, 0xf0, 0x18, 0x00, 0xff, 0x80, 0x00, 0x07, 0xfc, 0x00, 0x60, 0x00, 0x03, 0xfc, 0x00, 0x00, 0x00, 0xff, 0x00, 0x00, 0x00, 0x07, 0xf0, 0x00, 0x00, 0x00, 0x3f, 0x80, 0x00, 0x00, 0x0f, 0xc0, 0x00, 0x00, 0x00, 0x0f, 0xc0, 0x00, 0x00, 0x1f, 0x80, 0x00, 0x00, 0x00, 0x07, 0xe0, 0x00, 0x00, 0x3e, 0x00, 0x07, 0xff, 0x80, 0x01, 0xf0, 0x00, 0x00, 0x1c, 0x00, 0x3f, 0xff, 0xf0, 0x00, 0xe0, 0x00, 0x00, 0x00, 0x00, 0xff, 0xff, 0xfc, 0x00, 0x00, 0x00, 0x00, 0x00, 0x03, 0xfe, 0x01, 0xff, 0x00, 0x00, 0x00, 0x00, 0x00, 0x07, 0xf0, 0x00, 0x3f, 0x80, 0x00, 0x00, 0x00, 0x00, 0x0f, 0xc0, 0x00, 0x0f, 0xc0, 0x00, 0x00, 0x00, 0x00, 0x1f, 0x80, 0x00, 0x03, 0xe0, 0x00, 0x00, 0x00, 0x00, 0x1e, 0x00, 0x00, 0x01, 0xe0, 0x00, 0x00, 0x00, 0x00, 0x0c, 0x00, 0x00, 0x00, 0xc0, 0x00, 0x00, 0x00, 0x00, 0x00, 0x00, 0x00, 0x00, 0x00, 0x00, 0x00, 0x00, 0x00, 0x00, 0x00, 0x00, 0x00, 0x00, 0x00, 0x00, 0x00, 0x00, 0x00, 0x00, 0xfc, 0x00, 0x00, 0x00, 0x00, 0x00, 0x00, 0x00, 0x01, 0xfe, 0x00, 0x00, 0x00, 0x00, 0x00, 0x00, 0x00, 0x01, 0xfe, 0x00, 0x00, 0x00, 0x00, 0x00, 0x00, 0x00, 0x01, 0xfe, 0x00, 0x00, 0x00, 0x00, 0x00, 0x00, 0x00, 0x01, 0xfe, 0x00, 0x00, 0x00, 0x00, 0x00, 0x00, 0x00, 0x00, 0xfc, 0x00, 0x00, 0x00, 0x00, 0x00, 0x00, 0x00, 0x00, 0x00, 0x00, 0x00, 0x00, 0x00, 0x00, 0x00, 0x00, 0x00, 0x00, 0x00, 0x00, 0x00, 0x00
};
// AP圖形引入檔”image2.h”內容:
// 'WiFi_AP4', 55x35px
const unsigned char WiFi_AP4 [] PROGMEM = {
0xff, 0xff, 0xff, 0xff, 0xff, 0xff, 0xfe, 0xff, 0xff, 0xff, 0xff, 0xff, 0xff, 0xfe, 0xff, 0xff, 0xff, 0xfe, 0x7f, 0xff, 0x9e, 0xff, 0xff, 0xff, 0xfc, 0x7f, 0xff, 0x8e, 0xff, 0xff, 0xff, 0xf8, 0xe7, 0xf9, 0xc6, 0xff, 0xff, 0xff, 0xf9, 0xc7, 0xf8, 0xe6, 0xff, 0xff, 0xff, 0xf1, 0xcf, 0x3c, 0xe6, 0xff, 0xff, 0xff, 0xf3, 0x8e, 0x0c, 0x62, 0xff, 0xff, 0xff, 0xf3, 0x8e, 0x0e, 0x62, 0xff, 0xff, 0xff, 0xf1, 0xce, 0x1c, 0xe2, 0xff, 0xff, 0xff, 0xf9, 0xcf, 0x3c, 0xe6, 0xff, 0xff, 0xff, 0xf9, 0xe7, 0x39, 0xc6, 0xff, 0xff, 0xff, 0xfc, 0xff, 0x3f, 0xce, 0xff, 0xff, 0xff, 0xfe, 0x7f, 0x3f, 0x9e, 0xff, 0xff, 0xff, 0xff, 0xff, 0x3f, 0xfe, 0xff, 0xff, 0xff, 0xff, 0xff, 0x3f, 0xfe, 0xff, 0xff, 0xff, 0xff, 0xff, 0x3f, 0xfe, 0xff, 0xff, 0xff, 0xff, 0xff, 0x3f, 0xfe, 0xff, 0xff, 0xff, 0xff, 0xff, 0x3f, 0xfe, 0xff, 0xff, 0xff, 0xff, 0xff, 0x3f, 0xfe, 0xff, 0xff, 0xff, 0xff, 0xff, 0x3f, 0xfe, 0xff, 0xff, 0xff, 0xff, 0xff, 0x3f, 0xfe, 0xff, 0xff, 0xff, 0xff, 0xff, 0x3f, 0xfe, 0xc0, 0x00, 0x00, 0x00, 0x00, 0x00, 0x0e, 0x8f, 0xff, 0xff, 0xff, 0xff, 0xff, 0xe6, 0x8f, 0xff, 0xff, 0xff, 0xff, 0xff, 0xe6, 0x8f, 0xff, 0xff, 0xf9, 0xf3, 0xf3, 0xe6, 0x8f, 0xff, 0xff, 0xe0, 0xe0, 0xc1, 0xe6, 0x8e, 0x00, 0x01, 0xe0, 0xe4, 0xc0, 0xe6, 0x8f, 0xff, 0xff, 0xf0, 0xf1, 0xe1, 0xe6, 0x8f, 0xff, 0xff, 0xff, 0xff, 0xff, 0xe6, 0x8f, 0xff, 0xff, 0xff, 0xff, 0xff, 0xe6, 0xc0, 0x00, 0x00, 0x00, 0x00, 0x00, 0x06, 0xff, 0xff, 0xff, 0xff, 0xff, 0xff, 0xfe, 0xff, 0xff, 0xff, 0xff, 0xff, 0xff, 0xfe
};
程式名稱:ESP_CH7_AutoConnectOLED20.ino
程式一開始的前6行是本範例會使用到的引入函式庫及圖片資料,在此我們是使用前面介紹過的沒有使用OLED顯示器的連線函式庫「WiFiConnect.h」,而2~4行則是使用Adafruit OLED顯示器必須用到的函式庫;至於5,6兩行則是兩個圖片資料的常數陣列變數,【四.10-5 OLED顯示器綜合顯示實習—WiFi連線相關畫面設計】小節中已經介紹過他們的產生方式,為了方便程式的設計與管理,所以在Arduino IDE中是另外開了兩個標籤頁面來存放它們,因此使用時必須以引入的方式才行!而在上面的範例程式中為了方便說明,所以是放在主要程式的後面,如果嫌麻煩或是不會開啟新的標前頁面,可以直接照上面的程式列表內容拿來測試,但是要記得把這兩行註解掉。
#include "WiFiConnect.h"
#include <Wire.h>
#include <Adafruit_GFX.h>
#include <Adafruit_SSD1306.h>
#include "image.h"
#include "image2.h"
18~21行是跟SSD1306 OLED顯示器有關的變數宣告,而且使針對之前的Adafruit函式庫,由於本範例是綜合了【四.10-5】與【七.1-2】兩小節的程式所構成的,為了節省篇幅,以僅就其中有差異的部分加以說明。
由於我們會在OLED上顯示本地AP的名稱,而且是以所使用ESPXX晶片的內建序號為名,在此我們用下面這個字串變數建立這個AP的SSID名稱,其中的「ESP.getChipId()」指令會取得這顆晶片的序號,其長度共6位數。
23. String softSsidChip = "ESP"+String(ESP.getChipId());
在「startWiFi()」(34~63行)這個副程式中多了一段程式(43~58行),這是當ESPXX晶片無法連線上之前連過WiFi分享器時,用來實現在OLED上顯示【圖七•1-4_2】ESPXX晶片模組板進入本地AP模式設定畫面之用。
至於初始化(setup())程式區中,86~94行程式會在開機後先在OLED顯示器上顯示”Program Start!”訊息,讓使用者知道系統已經開機了!接著的96~103行程式則是實作出【圖七•1-4_1】的ESPXX晶片模組板開機連線WiFi分享器畫面,等呼叫「startWiFi()」(105行)這個副程式成功之後,110~121行程式再將【圖七•1-4_3】這個ESPXX晶片模組板連線成功畫面呈現在OLED顯示器上,這樣一來就完成了「WiFiConnect.h」使用者連線函式庫與Adafruit OLED顯示器函式庫結合的動作。
在最後面的159~183行及187~203行,分別是”WiFi_Map2”和”WiFi_AP4”這兩個圖檔的內容,如果嫌麻煩或是不會開啟新的標前頁面,可以直接照上面的程式列表內容拿來測試,但是要記得把這最前面的5、6這兩行引入檔註解掉。
◎ 執行結果:
前面的【圖七•1-4_1】至【圖七•1-4_3】其實就是此範例程式執行結果影片畫面的截圖,至於下面的第一段影片是ESPXX晶片使用OLED顯示器開機後,啟動連線失敗,沒有連上WiFi分享器,系統進入AP模式及設定的畫面。
而第二段影片則是ESPXX晶片使用OLED顯示器開機後,成功連上WiFi分享器畫面,這時OLED顯示器上會顯示分配到的本地IP位址,也就是【圖七•1-4_3】的內容。
沒有留言:
張貼留言